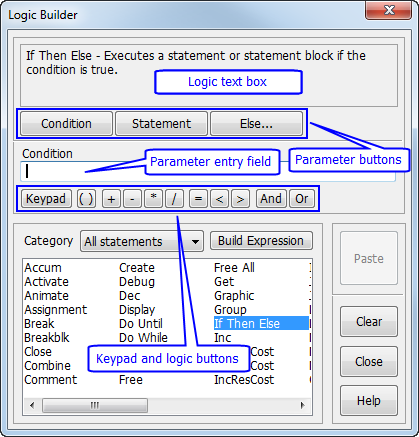
When the Logic Builder is opened from a logic window, it remains on the screen until you click the Close button or close the logic window or table from which it was invoked. This allows you to enter multiple statements in a logic window and even move around to other logic windows without having to constantly close and re-open the Logic Builder. The Logic Builder closes automatically when pasting to an expression field.
You can move to another logic window or field while the Logic Builder is still up by right clicking in that field or logic window. The Logic Builder is then reset with only valid statements and elements for that field or window, and will paste the logic you build into that field or window.
How to build a statement or expression:
When invoking the Logic Builder from a logic window, you have the option of building either statements or expressions. Different buttons and lists appear in the Logic Builder as you use the Logic Builder’s options depending upon whether you are selecting a statement or building an expression. The Logic Builder shown at the beginning of this section shows a statement being selected for building.
At the top of the Logic Builder is a display (logic text box) of the statement or expression you are building exactly as it will appear after it is pasted into the logic window. A brief description of the selected statement or function is displayed in the logic text box. This description is replaced with the statement or function syntax when you type a parameter, click a parameter or logic button, or double-click on the statement name. Other components of the Logic Builder are as follows:

Parameter buttons Below the logic text box are one or more buttons to control which parameter to enter for the statement or expression. Parameters can be expressions, statements, or functions. These buttons only appear when parameters may be required by the statement, and may change when you select a different statement. The name of the currently selected button appears immediately below the row of buttons and indicates whether or not the parameter is optional.
Parameter entry field This edit field allows you to enter or edit the current parameter. This only appears when parameters may be required by the statement. As soon as something is entered in this field, the Logic Builder switches to build mode to allow selection of functions or elements of the model.
Keypad button Click on this button to display the numeric keypad for entering numbers in the parameter entry field without using the keyboard.
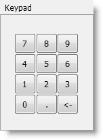
Logic buttons These buttons can be used to insert logical operators and other punctuation in the parameter entry field above. When you click the button, the operator is inserted at the cursor position in the field. A button appears only when the currently selected parameter can use that particular logical operator.
Logical & String Operators:

Time Unit Operators:

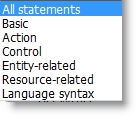
Category This combo box allows you to select which type of statements appear in the statement selection list below it. You can select all or a specific type.
Build Expression button This button allows you to create only an expression. It displays the logic elements list (see below) for you to create the expression. An expression consists of a combination of numbers, model elements, and/or functions, but does not include statements.
Statement selection list Choose which statement you wish to use from this list. Only valid statements are displayed for the logic window or field you are using.
Paste button This button pastes the text of the logic text box into your logic window or field. It is only available once the minimum requirements of the statement or expression have been completed. The Paste button closes the dialog if you are pasting to a field.
Clear button This button clears whatever you have done since the last paste and allows you to start over.
Close button Closes the Logic Builder without pasting the current logic text box.
Help button Launches the context sensitive help system.
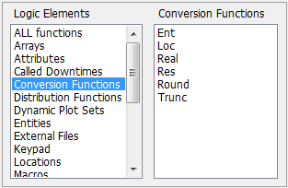
Logic Elements When editing an expression in the parameter entry field, the Statement selection list is replaced by Logic Elements. The box on the left lists logic and model element types. The box on the right lists individual selections from the logic or model element type selected.
Return and Cancel Buttons When editing the parameters of a function or nested statement, two additional buttons appear to the right of the parameter edit box: Return and Cancel.

The first thing to do in creating a statement with the Logic Builder is to select the desired statement from the statements list box. You can restrict the list of statements to choose from using the Statement Type combo box above the statement list. If you are just starting to use
To select a statement, left click on the statement name in the list box. The statement name appears in the logic text box along with a brief description. The parameter buttons also appear just below the logic text box.
Before you begin editing the parameters of the statement, you can select a different statement. However, once you begin defining a parameter, you must click the Clear button to abandon that statement and select another.
Building a statement is simply a matter of filling in the parameters. To enter a parameter, click the appropriate parameter button below the logic text box. The parameter name is displayed above the parameter entry field. Whatever you type in this field or select from the Logic Elements list replaces the parameter name in the logic text box. The parameter name reappears when the entry field is cleared. The names of optional parameters are not displayed in the logic text box.
An optional shortcut to begin editing the statement’s first parameter is to double click on the statement name in the statement list box.
The Logic Elements list box, containing model elements and functions, appears with a selection list box to its right. A number pad element is included in the list, which can also be accessed using the Keypad button.
When you click on an item in the Logic Elements list, the model elements or functions related to that item are listed in the selection box on the right. For example, when you click on Entities, the selection list is entitled Entities and it contains all the entities defined in the model.
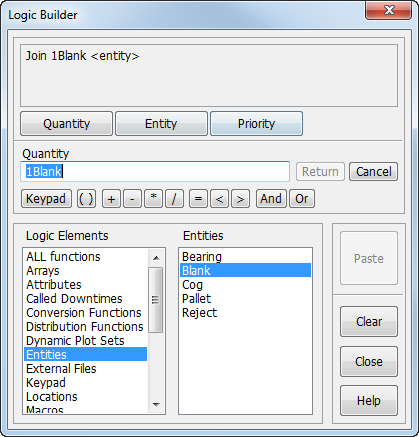
How to place a model element in the parameter entry field:
How to place a function in the parameter entry field:
When you select a function as the parameter for your statement, you must also define that function’s parameter(s). In defining the function’s parameter(s), you may use another function which will also require defined parameters. This second function is called a nested function. In addition, a function may be nested within a nested function. Functions can be nested as many levels as you like. In this way, the logic builder helps you create complex expressions that would be difficult to enter manually.
Control statements such as If...Then and While...Do contain parameters that are themselves statements. These are called nested statements. For example, an If...Then...Else statement might look something like this:
Nested If, Then, Else
If (Variable1 > 10) Then
{
<Statement1>
<Statement2>
}
Else
{
<Statement3>
<Statement4>
}
One or more statements may appear in the block between the curly braces. The Logic Builder allows you to define the first statement of the block. To add other statements to the block, place the cursor in the logic edit window where you want the next statement and use the Logic Builder to write the statement and paste it in. For example, in the following Logic Builder window, an If...Then...Else statement is being built.
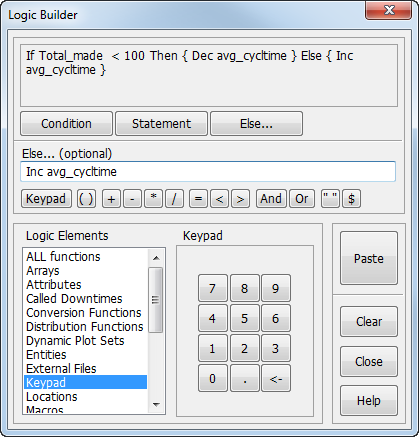
The Else statement is built with the parameter button labeled Else and the statement following Then is built using the button labeled Statement. When you click on the parameter button labeled Statement, the statement list box is displayed where you can select from the list of valid logic statements. Click on paste in the above example and you get:
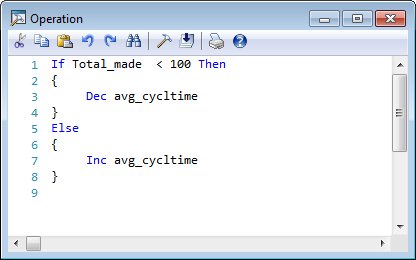
The parameters of nested statements may be model elements or functions, and within those functions you may have nested functions. This allows you to easily build complex control statements without worrying about syntax and placement of nested statements and functions.
In addition to creating statements, the Logic Builder can also be used to create just an expression or to simply paste a particular element such as a variable or resource name. You may not need to create a complete statement, or the field may not accept statements. Pressing the Build Expression button allows you to build and paste expressions, including individual logic or model element names, into your logic window or field.
The expression being built or element being selected is displayed at the top of the window in the logic text box. Use the parameter edit field to build the expression. You can use model elements and/or functions in your expression. When you are finished, click the Paste button to place the expression or selected logic/model element in the logic window or edit field.
|
© 2016 ProModel Corporation • 556 East Technology Avenue • Orem, UT 84097 • Support: 888-776-6633 • www.promodel.com |